Table of Contents
Introduction
There are different ways to capture and read traffic from your Roku Streaming device.
The following are some useful links:
- DD-WRT (If router firmware is too standard)
- Wireshark (Free for decrypting tcpdump)
- Charles Proxy (Easy setup, Easy GUI, Not free, Optional)
Before performing any of the methods that use Wireshark, make sure you have the correct keys for SSL decryption. Click for more information on Wireshark SSL.
Click for more information on how to create a self-signed SSL certificate.
Important: Before performing the following steps, make sure you have established your own SSL encryption (the method in this sample is a self-signed CA).
- Create and sign CA certificate.
- Create and sign web server certificate with CA certificate.
- Include your CA certificate inside your Roku Streaming player.
- Navigate to Wireshark -> Preferences -> Protocols -> SSL
- Click Edit and add your private key to the RSA keys list.

DD-WRT (IPtables)
Important: Before performing the following steps, make sure that SSH management is enabled on DD-WRT.
- SSH into DD-WRT as root root.
Add DD-WRT to monitor traffic by entering the following console commands:
root@DD-WRT:~# iptables -t mangle -A POSTROUTING -d <Device-To-Monitor-IP> -j ROUTE --tee --gw <Listening-Device-IP>
root@DD-WRT:~# iptables -t mangle -A PREROUTING -s <Device-To-Monitor-IP> -j ROUTE --tee --gw <Listening-Device-IP>
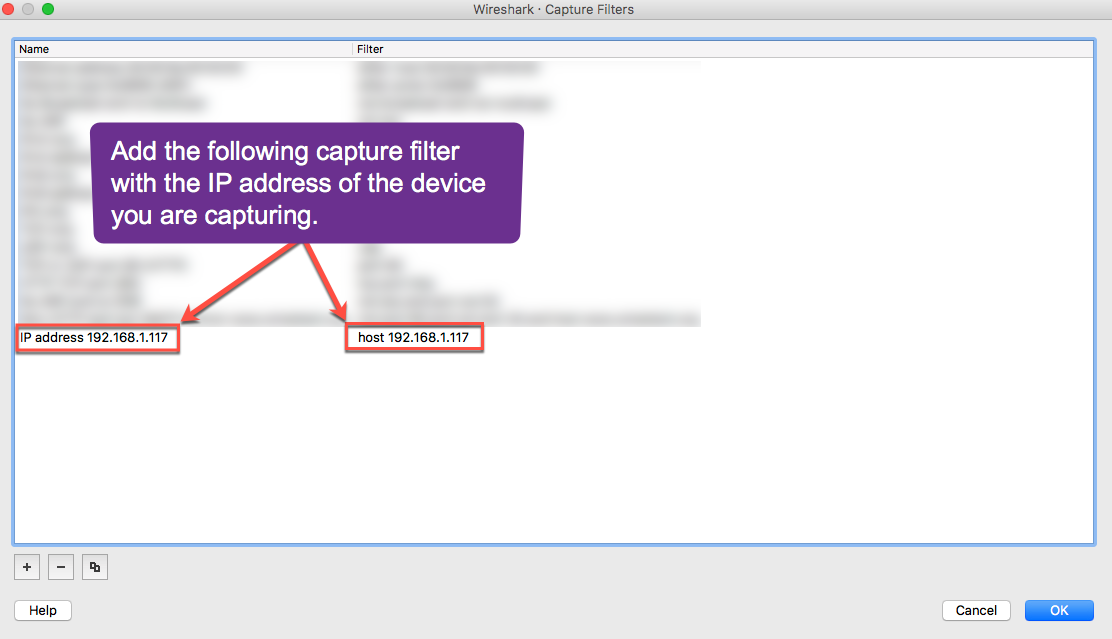
Launch Wireshark, select Capture from the top menu, and add the following capture filter with the IP address of the device that you want to capture.
Select OK when done.Field 1: IP address <IP Address> Field 2: host <IP Address> 
- Go to the Wireshark preferences and open the columns tab.
- Add a new filter with title: “channel” and select “Frequency/Channel” in the drop-down menu for the field type.
Start your application and start Wireshark Port Monitoring capture and sort through packets.
Mac OS
Wireshark
Another easy way to capture SSL packets using Mac OS is through the wireless diagnostics tool that comes with your Macbook®.
All you need is:
- the wireless channel of your Wifi connection, and
- the channel width (20MHz, 40MHz, 80MHz).
These settings can be set in the Web GUI of your router. If this is not possible through the Web GUI of your router, find the default channel setting of your Wifi or install a different firmware on your router that can change this.
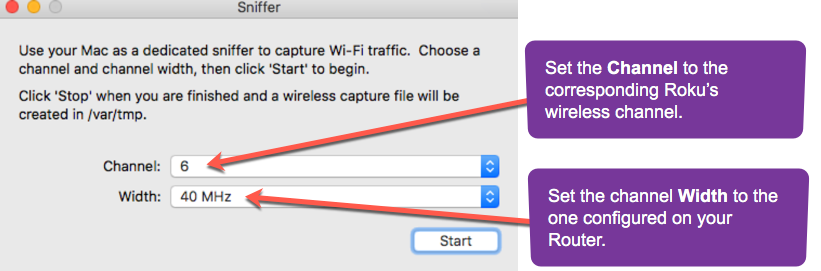
Setup your Wifi connection and open the Wireless Diagnostics tool (Pre-installed on later versions of Mac OS).
In the top bar, find the field labeled window and choose the Sniffer tool.
In the window for the sniffer tool:
set the Channel to the corresponding Roku’s wireless channel (Same channel as one displayed on router Web GUI) and,
set the channel Width to the one configured on your Router. Select from the Drop-Down menus.

Start the Sniffer tool and launch your Roku application. Once you have stopped the recording, the file containing your recorded internet traffic will be exported to the file path displayed in the Sniffer window (In this case /var/tmp).
Launch Wireshark and open the cap file exported from your Sniffer tool.
Tcpdump
- The previous method can also be viewed using tcpdump.
After going through steps 1 through 4 in the section above, you can open the cap file.
$ tcpdump -r /path/to/packetfile.cap