Table of Contents
Node Class References: Animation, SequentialAnimation, ParallelAnimation
Interpolator Node References: Vector2DFieldInterpolator, FloatFieldInterpolator, ColorFieldInterpolator
The following XML SceneGraph markup examples demonstrate how to animate renderable nodes. This allows you to move text, shapes, pictures, and videos around the display screen, fade them in and/or out of view, slide them completely off the display screen area, move them over each other, and change their color.
All of these animation effects are accomplished using Animation node classes that target specific fields of renderable nodes, changing them over a specified time to achieve the animation effect. Depending on the fields to animate, you will use one of three interpolator node classes:
- Vector2DFieldInterpolator
- FloatFieldInterpolator
- ColorFieldInterpolator
Let's look at how to use each of the interpolator node classes to animate renderable nodes. Then let's look at the SequentialAnimation and ParallelAnimation nodes, which allow you to run several animations either sequentially or in parallel.
Vector2DFieldInterpolator Markup
Example Application: AnimationV2DExample.zip
Interpolator Node Reference: Vector2DFieldInterpolator
In this example, we'll use a Vector2DFieldInterpolator node to animate the translation field of a Rectangle node, causing it to move around the screen. If you look at the animationv2dscene.xml file in the example application package, you'll note we are using a similar Rectangle node definition to some we used in previous tutorial examples, specifically the big blue rectangle in Z-Order/Parent-Child Markup:
<Rectangle id = "movingRectangle" width = "720" height = "240" color = "0x1010EBFF" />
But we're defining it as a child node of a larger Rectangle node to set the boundaries of the animation. We make this parent Rectangle node invisible by setting the alpha channel to 0x00:
<children>

  <Rectangle
    id = "exampleRectangle"
    width = "900"
    height = "330"
    color = "0x10101000" >

    <Rectangle
      id = "movingRectangle"
      width = "720"
      height = "240"
      color = "0x1010EBFF" />

  </Rectangle>

  <Animation
    id = "exampleVector2DAnimation"
    duration = "5"
    easeFunction = "linear" >

    <Vector2DFieldInterpolator
      key = "[ 0.0, 0.5, 1.0 ]"
      keyValue = "[ [0.0,0.0], [180.0,90.0], [0.0,0.0] ]"
      fieldToInterp = "movingRectangle.translation" />

  </Animation>

</children>
We're actually only using this parent Rectangle node to establish the dimension limits of the animation; it is not visible in the example, but allows us to center the moving rectangle at the mid-point of the animation.
This all might look a little confusing so let's break it down piece by piece:
- We added an ID for the Animation node to target the node by BrightScript code in the
init()function:
id = "exampleVector2DAnimation"
- We set the duration of the animation to five seconds:
duration = "5"
- We are using the most typical "linear" definition of the
easeFunctionfield, which is actually the default animation ease function:
easeFunction = "linear"
- In the Vector2DFieldInterpolator child node, we have two fields with arrays of values that must have the same number of values:
key = "[ 0.0, 0.5, 1.0 ]" keyValue = "[ [0.0,0.0], [180.0,90.0], [0.0,0.0] ]"
- the
keyfield array contains the fractional values of the five second duration of the animation where the field value specified by the correspondingkeyValuearray is set; for this animation there are three key values which basically divide the animation into three parts, a beginning (0.0), a middle (0.5), and an end (1.0) - the
keyValuefield array contains the values of the Rectangle nodetranslationfield that will be set at the corresponding fractional value in thekeyarray, to position the rectangle at the specified X,Y position on the display screen - The
fieldToInterpfield then defines which of the Rectangle node fields to animate; in this case it is thetranslationfield of themovingRectanglenode as identified by its ID field:
fieldToInterp = "movingRectangle.translation"
Now to start the animation, we have to set the control field of the Animation node object to play using BrightScript in the init() function, where we also set the repeat field to true to have the animation to repeat (endlessly) after completing:
m.vector2danimation = m.top.FindNode("exampleVector2DAnimation")m.vector2danimation.repeat = truem.vector2danimation.control = "start"
The following shows the position of the text on the display screen correlated with the duration field time, the key field fractional portion of the animation, and the keyValue position of the moving rectangle:
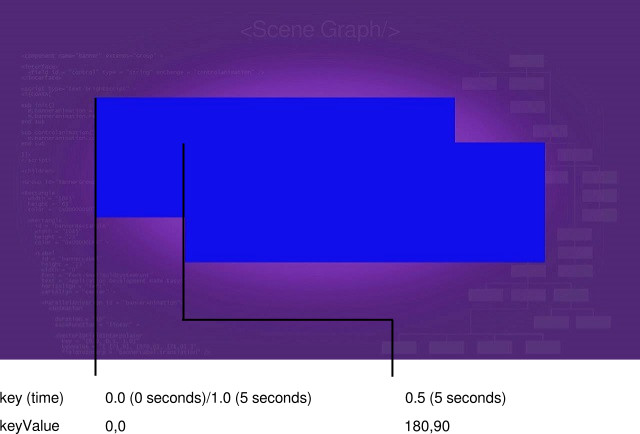
It can take a little while to correlate the definitions of these fields with the movement of the rectangle on the screen, so take some time and watch it move back and forth...and back and forth...
FloatFieldInterpolator Markup
Example Application: AnimationFloatExample.zip
Interpolator Node Reference: FloatFieldInterpolator
In this example, we'll use a FloatFieldInterpolator node to animate the opacity field of a Poster node, causing it to fade in and out of visibility. We'll go ahead and use the same Poster node definition we used in Renderable Node Markup previously. The following shows the XML Animation node and FloatFieldInterpolator child node definitions for this:
<Animation id = "exampleFloatAnimation" duration = "5" easeFunction = "linear" >
<FloatFieldInterpolator key = "[ 0.0, 0.5, 1.0 ]" keyValue = "[ 1.0, 0.0, 1.0 ]" fieldToInterp = "examplePoster.opacity" />
</Animation>
We've kept this example simple by using the same duration and key field definitions as in the previous Vector2DFieldInterpolator example. This means that the animation will again last five seconds, and be divided into three parts: a beginning at 0 seconds (key value 0.0), a middle at 2.5 seconds (key value 0.5), and an end at five seconds (key value 1.0). Note that this causes the examplePoster to gradually disappear from the display screen, be fully invisible at 2.5 seconds, then gradually reappear until it is completely visible at five seconds. And again, because the animation repeat field was set to true, this happens over and over and over again...
ColorFieldInterpolator Markup
Example Application: AnimationColorExample.zip
Interpolator Node Reference: ColorFieldInterpolator
For this final Animation node interpolator example, we'll change the color of a rectangle. To do this, we must use the ColorFieldInterpolator node, which can change the color field of a target node over the time of the animation specified in the Animation node duration field. Once again, to keep it simple, we'll use the same duration, and key field definitions used in the previous interpolator examples, and use the same Rectangle node markup from Renderable Node Markup:
<Animation id = "exampleColorAnimation" duration = "5" easeFunction = "linear" >
<ColorFieldInterpolator key = "[ 0.0, 0.5, 1.0 ]" keyValue = "[ 0x1010EBFF, 0x10101FFF, 0x1010EBFF ]" fieldToInterp = "exampleRectangle.color" />
</Animation>
Because we used many of the same field definitions as the previous interpolator examples, it should be clear that the only difference here is that the animation changes the color field of the target exampleRectangle rectangle, so it changes the rectangle color rather than moving or fading it. The color changes from blue (0x1010EBFF) at 0 seconds, to black (actually a very dark shade of blue, 0x10101FFF) at 2.5 seconds, and back to blue at five seconds.

SequentialAnimation Markup
Example Application: AnimationSequentialExample.zip
Node Class Reference: SequentialAnimation
The SequentialAnimation node class allows you to group several related animations together to run in sequence, one after another.
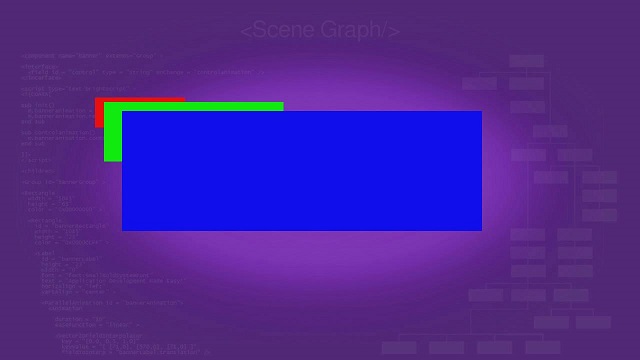
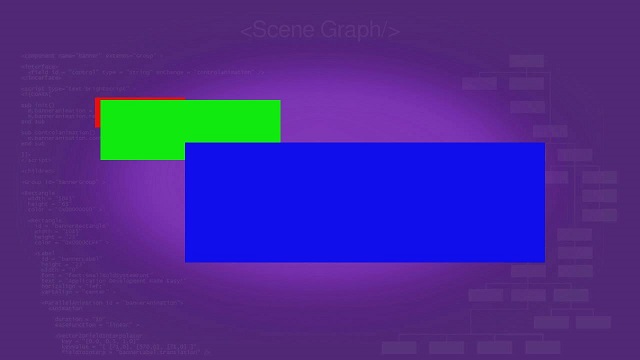
Remember how we used the big blue rectangle from previous tutorial examples in Vector2DFieldInterpolator Markup? That rectangle was one of three we used to show how Roku SceneGraph implements z-order and parent-child node relationships in Z-Order/Parent-Child Markup. AnimationSequentialExample.zip shows how to move those rectangles so that you see each underlying rectangle in sequence.
<children>

  <Group id = "animatedRectangles" >

    <Rectangle
      id = "lowestRectangle"
      width = "180"
      height = "60"
      color = "0xEB1010FF" />

    <Rectangle
      id = "middleRectangle"
      width = "360"
      height = "120"
      color = "0x10EB10FF" />

    <Rectangle
      id = "highestRectangle"
      translation = "[ 180.0, 90.0 ]"
      width = "720"
      height = "240"
      color = "0x1010EBFF" />

    <SequentialAnimation id = "exampleSequentialAnimation" >

      <Animation
        duration = "3"
        easeFunction = "linear" >

        <Vector2DFieldInterpolator
          key = "[ 0.0, 1.0 ]"
          keyValue = "[ [0.0,0.0], [180.0,90.0] ]"
          fieldToInterp = "highestRectangle.translation" />

      </Animation>

      <Animation
        duration = "3"
        easeFunction = "linear" >

        <Vector2DFieldInterpolator
          key = "[ 0.0, 1.0 ]"
          keyValue = "[ [0.0,0.0], [60.0,30.0] ]"
          fieldToInterp = "middleRectangle.translation" />

      </Animation>

      <Animation
        duration = "3"
        easeFunction = "linear" >

        <Vector2DFieldInterpolator
          key = "[ 0.0, 1.0 ]"
          keyValue = "[ [60.0,30.0], [0.0,0.0] ]"
          fieldToInterp = "middleRectangle.translation" />

      </Animation>

      <Animation
        duration = "3"
        easeFunction = "linear" >

        <Vector2DFieldInterpolator
          key = "[ 0.0, 1.0 ]"
          keyValue = "[ [180.0,90.0], [0.0,0.0] ]"
          fieldToInterp = "highestRectangle.translation" />

      </Animation>

    </SequentialAnimation>

  </Group>

</children>
The first step is to define the rectangles, which we've done before. In this case though, we don't define the translation field values for the rectangles, except for the last rectangle, since we'll be moving the rectangles by changing the values of the translation fields in the animations. But we do set the translation field value of the last rectangle, the big blue rectangle, to set the boundary of the animation at its furthest point. This allows us to center the animated rectangles as we've done in all the tutorial examples.
Then we define the SequentialAnimation node, which will be the parent node of several child animation nodes that move the rectangles in sequence. We define the parent SequentialAnimation node ID as exampleSequentialAnimation, so that we can run all the child animation nodes in sequence by setting the control field value of this parent node to start in the init() function. After that, we define the several child animation nodes, to be run in the sequence of their definition. Note that each child animation node is a complete animation with a duration field, and a child interpolator node. For example, the first child animation node moves the big blue rectangle from X,Y coordinates 0,0 to 180,90 in three seconds:
<Animation duration = "3" easeFunction = "linear" > <Vector2DFieldInterpolator key = "[ 0.0, 1.0 ]" keyValue = "[ [0.0,0.0], [180.0,90.0] ]" fieldToInterp = "highestRectangle.translation" /></Animation>
And each successive child animation nodes moves one of the rectangles in a similar manner.
We start the animations in the init() function in the usual way, by setting the control field value of the parent SequentialAnimation node to start:
m.examplesequentialanimation = m.top.findNode("exampleSequentialAnimation")m.examplesequentialanimation.repeat = truem.examplesequentialanimation.control = "start"
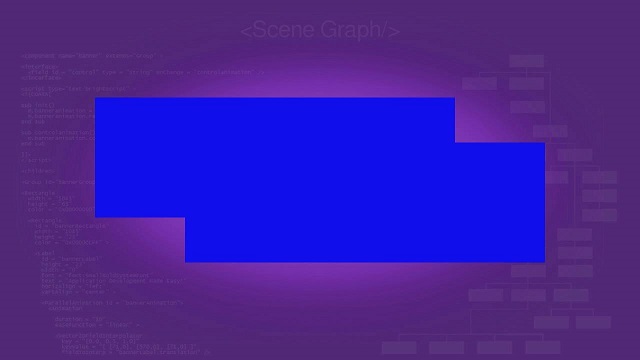
And the result is:

ParallelAnimation Markup
Example Application: AnimationParallelExample.zip
Node Class Reference: ParallelAnimation
The ParallelAnimation node class is very similar to the SequentialAnimation node class, in that it is a parent node to several child animation nodes. But instead of running each child animation node in sequence, the child animation nodes are run at the same time, in parallel.
Let's animate the same three rectangles in SequentialAnimation Markup to move the same way, but this time in parallel:
<children>

  <Group id = "animatedRectangles" >

    <Rectangle
      id = "lowestRectangle"
      width = "180"
      height = "60"
      color = "0xEB1010FF" />

    <Rectangle
      id = "middleRectangle"
      width = "360"
      height = "120"
      color = "0x10EB10FF" />

    <Rectangle
      id = "highestRectangle"
      translation = "[ 180.0, 90.0 ]"
      width = "720"
      height = "240"
      color = "0x1010EBFF" />

    <ParallelAnimation id = "exampleParallelAnimation" >

      <Animation
        duration = "5"
        easeFunction = "linear" >

        <Vector2DFieldInterpolator
          key = "[0.0, 0.5, 1.0]"
          keyValue = "[ [0.0,0.0], [60.0,30.0], [0.0,0.0] ]"
          fieldToInterp = "middleRectangle.translation" />

      </Animation>

      <Animation
        duration = "5"
        easeFunction = "linear" >

        <Vector2DFieldInterpolator
          key = "[0.0, 0.5, 1.0]"
          keyValue = "[ [0.0,0.0], [180.0,90.0], [0.0,0.0] ]"
          fieldToInterp = "highestRectangle.translation" />

      </Animation>

    </ParallelAnimation>

  </Group >

</children>
Again we set the boundary of the animation at its furthest point by setting the translation field of the big blue rectangle. And again we define a parent ParallelAnimation node with several child animation nodes. The child animation nodes differ from AnimationSequentialExample.zip in that they have an entire set of keyValue field values, to move the rectangles to their furthermost position, then back to their starting position.
And again the parallel animation is started in the init() function:
m.exampleparallelanimation = m.top.FindNode("exampleParallelAnimation")m.exampleparallelanimation.repeat = truem.exampleparallelanimation.control = "start"
And the result is: